Setting up a new Dynamics 365 instance
If you are new to Dynamics 365, you may need to create a new Dynamics 365 instance to get started with Work 365.
Pre-requisite
Completion of this process requires the following pre-requisites
- Availability and activation of ANY of the following Dynamics 365 licenses. If you are a Microsoft partner, you may already have these as part of your internal use rights (IUR). See this article on how to activate your IUR licenses. https://portal.iotap.com/knowledgebase/article/KA-01169
- Dynamics 365 Customer Engagement
- Dynamics 365 Sales Pro
- Dynamics 365 Sales Premium
- Dynamics 365 Sales Enterprise
- Global Administrator privileges
Time for completion
This procedure is expected to take 10 minutes.
Procedure
- Login to https://admin.powerplatform.com using Global Administrator credentials. Click the Environments option in the left-hand side menu.
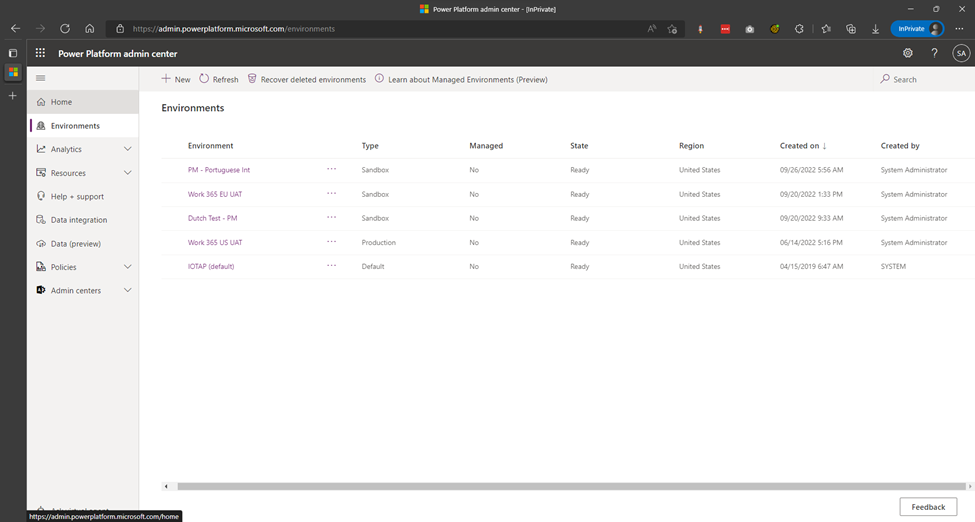
- If you are new to Dynamics 365, you should see a single environment listed with Type = “Default”.
- Dynamics applications such as Sales cannot be installed in the ‘Default’ environment and hence a new environment must be created.
Note: you may be able to leverage an existing environment (if available) for Work 365 if that environment has Dynamics 365 Sales installed. In this case, contact your CRM administrator for additional information. See the end of this article on how to check if an environment has Dynamics 365 Sales installed.
- Click the “+ New” button in the ribbon. The “New environment” pane opens. Fill in the details as relevant to your organization and click the “Next” button.
| Field | Value |
|---|---|
| Name | Name of your organization |
| Region | Choose the region that is closest to your office |
| Type | Production or Sandbox (if creating a test/development environment) |
| Create a database for this environment | Yes important! |
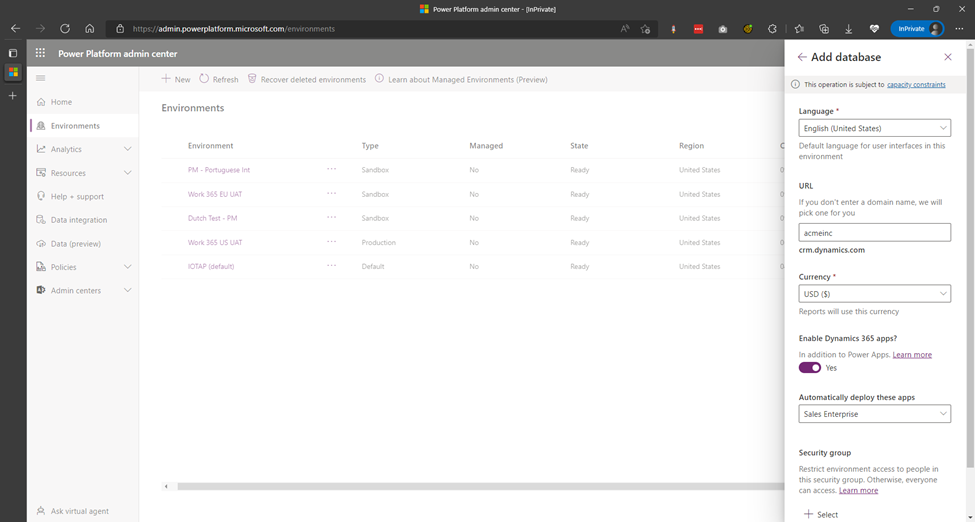
- On the next screen, in the relevant details. Ensure that specify a custom URL for your organization.
| Field | Value |
|---|---|
| Language | Choose the base language for Dynamics. You will be able to add other languages later, if required. However, the base language once set, cannot be changed. |
| URL | Specify an easy to remember moniker for your Dynamics URL. This will form the first part of your Dynamics 365 URL. It is recommended that you use a short name or derivative of your company name for this field. important! |
| Currency | Choose the base currency for Dynamics. You will be able to add other currencies later, if required. However, the base currency once set cannot be changed. |
| Enable Dynamics 365 apps | Yes important! |
| Automatically deploy these apps | Choose whichever version of ‘Sales’ app that is available to you. In the screenshot below, ‘Sales Enterprise’ is selected; however, it is acceptable to selected either ‘Sales Pro’ or ‘Sales Premium’. |

- Click the “Save” button. The new environment should now show up in the list of environments with “State” as “Preparing Instance”. Wait for the state to change to “Ready” – you may need to click the Refresh button a few times. This process usually takes a minute or two.