
GoCardless
Setting up a GoCardless Payment Processor
- Navigate to Work 365 > Payment Processors and click on ‘+New’ to create a new GoCardless Payment Processor which is the engine that processes the payments.
- Fill in the Name, lookup the Type and select GoCardless, which will update the fields below and then Save the record.
- Select the option in the Environment Field.
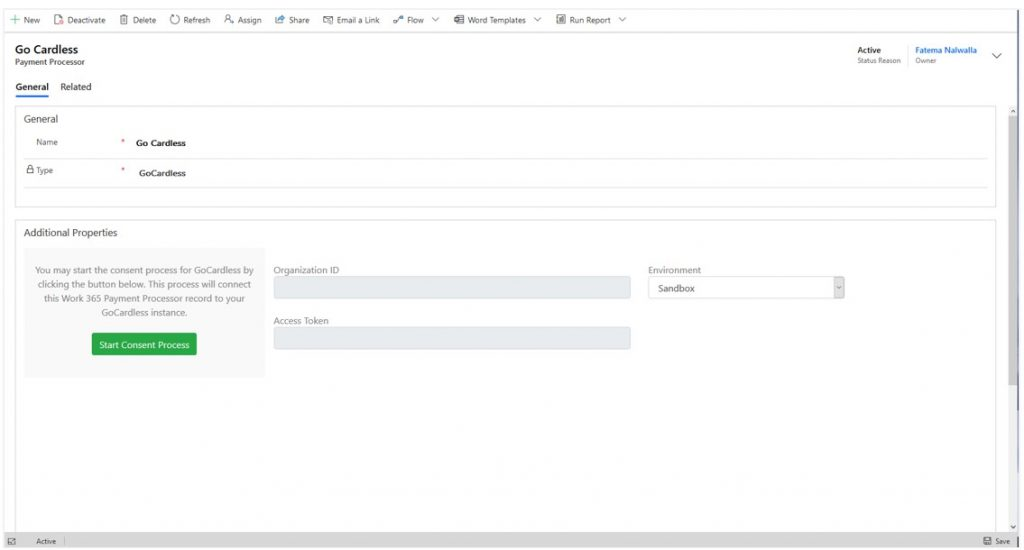
- Click on ‘Start Consent Process’, this will open a popup. Click on the ‘Start Consent Process’, it will redirect to the GoCardless site.
For Existing GoCardless Customers
- Fill in the email address and password and select the checkbox to agree to the Merchant Agreement and then click on ‘Connect Account’.
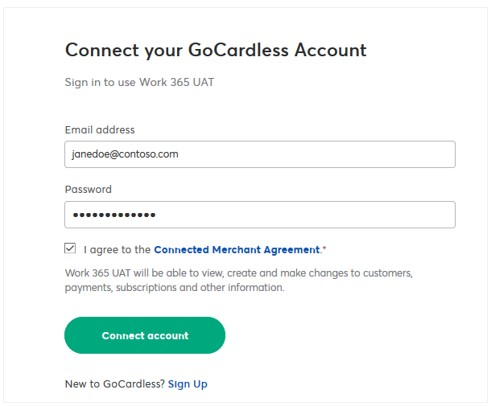
- Existing customers who have completed verification with GoCardless will receive the Consent Successful message. Otherwise, they might see a warning just like new customers.

- Go back to the Payment Processor page, refresh it, the Organization Id and the Access Token should be filled in

How to set up a GoCardless Payment Profile?
Payment Profiles in GoCardless are termed as Mandates. To set up a Mandate please follow these steps:
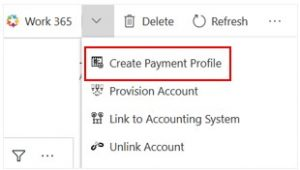
- Go to Accounts, click on the Work 365 Menu option and hit ‘Create Payment Profile’, a popup will open.
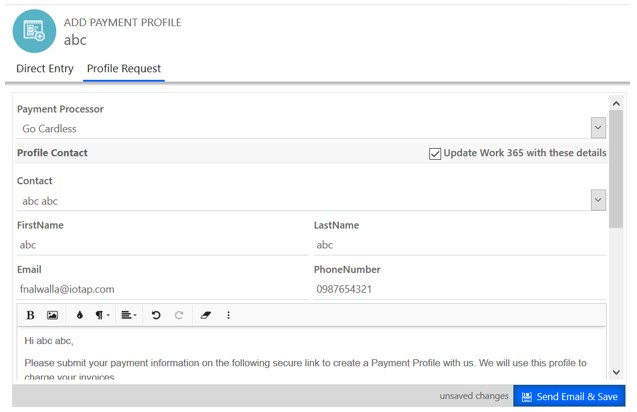
- There are two ways to create a mandate, directly through Work 365, or via a Profile Request.
Direct Entry: Select ‘GoCardless’ or the name assigned to the GoCardless Payment Process in your system. After filling in the details, hit Proceed.
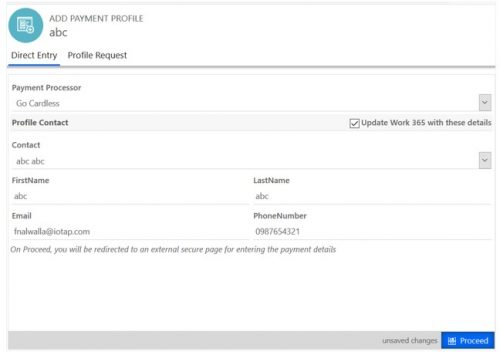
This will redirect the page to the GoCardless application, where all the Direct Debit details can be filled in.
- Profile Request: With this option, an email is sent directly to the customer with a secure link, that will redirect them to the GoCardless page where they can fill in their Direct Debit details.
After creating a Payment Profile, the profile will be visible under the Payment Profiles page. For certain Countries or Schemes the Payment Profiles will be created in the Pending Status Reason and later becomes Active. For it to become Active, the first payment needs to be submitted. For others, they will be directly created as Active. A comprehensive list is given below:
- Bacs: Created in Active state
- SEPA: Created in Pending State
- Autogiro: Created in Active state
- Betalingsservice: Created in Active state
- Becs AU: Created in Pending State
- Becs NZ: Created in Pending State
- PAD: Created in Active state
- ACH: Created in Pending State
How is the invoice processed with GoCardless?
Direct Debit takes a couple of days to process compared to Credit Card payments which is instant. It is created in the Pending Status Reason and later updated to Active.
When a Payment Profile is created for a Customer Account, it can be used against Billing Contracts for that Account. However, the Status Reason on the Payment Profile must be ‘Active’.
Manual charge or Auto Charge functionalities can be used to charge the invoice.
There is a new field that is on the Invoice which called ‘Last Charge Status’ which indicates the status of the latest Payment Transaction of the invoice and will have the following states:
- Not Charged
- Pending
- Failed
- Paid
- Cancelled
What happens when the payment fails?
When an invoice is connected to a GoCardless Payment Profile, there is a lag in payment as there is an approval process. In cases when the payment fails, the Payment Transaction and Last Charge Status on Invoice will be updated to Failed.
- Navigate to the Payment Transaction or Payment Profile associated with that invoice.
- Check the Timeline section and click on the Open Record icon to open the Payment Event.
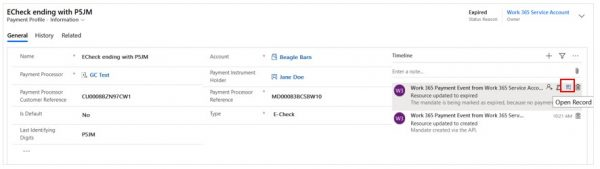
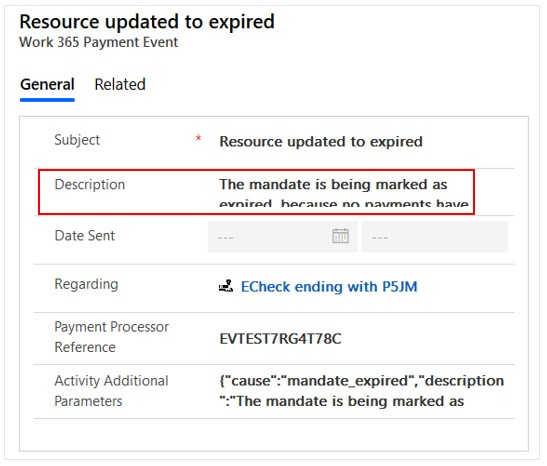
This will provide the reason for the failure under the description section. Take the appropriate action to fix the issue and re-try the payment transaction against that invoice.
What happens when the Payment Profile is cancelled?
When a Payment Profile is cancelled, Work 365 does the following:
- Sends the Payment Profile Change email to the customer, which states the reason for the cancelled Payment Profile.
- Creates a Payment Event activity, which is visible on the Payment Profile form. Follow the steps outlined above and take the appropriate action.
- Updates the status of the Payment Profile status to cancelled
Updated over 2 years ago